
Today I thought that I would share my idea for layering one of the Georgie digital stamps 'Georgie Angel' Now, for this post I messed around with the stamp and created a GSD to cut out the image with my cutting machine. You don't have to have a cutting machine. You could just print out the digital stamp image four times and just cut the parts that you want to layer out.
Please remember: Not all digital stamp designers would be happy with you doing this sort of thing so you must remember to check all terms and conditions linked with each stamp. If it is not mentioned there, doesn't mean it's OK to do. Always ask.
Right, here is what I started out with for this project,

I decided that I wanted to layer her face, the upper part of her body and her hands holding the heart.
I coloured the images in with Promarkers before I cut them out. Colouring small parts of images when they are already cut out is really hard in my opinion but if you prefer to cut out first please go ahead.

Before I go on, if you have a few Promarkers you might like to grab this really helpful free download from Sarah Hurley.
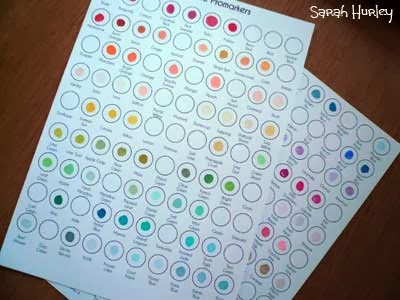
It's a fab layout of all the names of the currently available Promarkers (including Limited Editions) with circles to add the pen colour to. Print the download onto the same paper/card that you use for colouring your digital stamps and colour in each of your markers. It will then give you a true coloured effect. Sarah has laid them out in a really helpful order. Grab the free download from her website http://www.sarahhurleydesigns.co.uk/oldshop/prod_2834920-Promarker-Colour-Charts-Updated-for-Winter-2013.html Please don't just share this freebie with your friends send them over to Sarahs website to grab their own copy.

Here is Georgie all coloured in. If you want more details about the colours I used then pop over to my personal blog Funky Hand Thoughts for more information.


If you have purchased the Georgie Angel digital stamp and would like the GSD I used in this post, send me a message through the Funky Hand website Contact Us page and I will email it to you for free.
So, I hope you all have a wonderful Christmas and you receive any crafting stash that you have asked Santa for. I'm crossing my fingers that he will have some of the Promarkers that I have missing from my collection in his sack for me. I've been a very good girl all year..well most of the time. Hehe!
Anice xx
Great tut Anice. Loved how Georgie looks!
ReplyDeleteThanks very much Tabbatha.
DeleteWhat a great card Anice.Fantastic layers and colouring.As for your pro marker collection-wow! I am green with envy.Hugs Debbie x
ReplyDeleteHa Ha! Debbie. Ian isn't that pleased with my Promarker collection. When he saw it, I had to tell him that I had had them all 'for ages'..that old one!!
Delete